Initial commit based on a combination of the original useful-script and local changes.
The XML include file should be useable read-only.
-
MySQL or MariaDB client installation and environment set-up so that the Netprobe will load SQL-Toolkit
-
Default variables in the include file do not include a password for the user and in the general case all should be overridden when attached to a Managed Entity
-
Privileges set for the configured user. The minimum set for a default install is specified here, but if the database or configuration has been changed then this must be adjusted accordingly:
GRANT PROCESS ON *.* TO `geneos`@`localhost`;
GRANT SHOW VIEW ON `geneos_db`.* TO `geneos`@`localhost`;
- MYSQL_DB_SERVER - Server hostname/IP. Default localhost
- MYSQL_DB_PORT - Database port. Default 3306
- MYSQL_DB_USER - Database user with permissions to issue status queries. Default "geneos"
- MYSQL_DB_PASS - Password for above user. REQUIRED and no default set.
- MySQL_DB_NAME - Database instance name. Default "geneos_db"
- MYSQL_STATUS_SAMPLE_INTERVAL - Sample interval. Default 60 seconds.
Extra computed headlines are defined as string lists. This allows the user to add their own while using the XML file as read-only. If you change these you should copy the defaults over to retain default summary headlines. You can also remove them to stop computed rules from running.
- MYSQL_STATUS_GLOBAL_HEADLINES - For the "Global Status" dataview. Default [ "cacheHitRate", "cacheInsertRate", "cachePruneRate" ]
- MYSQL_STATUS_VARIABLES_HEADLINES - For the "Variables" dataview. Default [ "serverVersion" ]
- MYSQL_LOGFILE - Location of readable server logfile. Sampler disabled as log file format varies too much.
- MYSQL_SLOW_QUERIES_LOGFILE - Location of readable long queries log. Sampler disabled and provided as an example. Long Query logs must be enabled in the server config.
The ability to automated geneos alert messages into your ServiceNow environment, and the ability to analyze.
Warning
DEPRECATED
Please use the updated integration in the cordial repo:
Direct link: https://github.com/ITRS-Group/cordial/tree/main/integrations/servicenow
- Toolkit Samplers:
- TableName-Open - List of Tickets that are not closed or not solved
- TableName-OnHold - List of Tickets that are "On Hold"
- TableName-InProgress - List of tickets that are "InProgress"
You must have python 3.5 or higher to install:
$ python -V
This script does depend on the requests and pysnow module pysnow:
$ pip install pysnow
There are instructions on the web on how to
- Open up the Gateway Setup Editor
- In the Gateway Setup Editor, right click on the "Includes" folder, then add a new include.
- Enter in the path to the ServiceNow Template and change the priority (to something other than 1).
- Load the ServiceNow include file by clicking on the plus sign by the new file, and then clicking "Click to load...".
- The template uses the following variables whose default values are defined under:
servicenowMonitoring.xml -> Environments -> ServiceNow
Each toolkit sampler you must configure appropriate TableSpace name, username, password, and ServiceNow instance name. Below is an example of view of a configured toolkit.
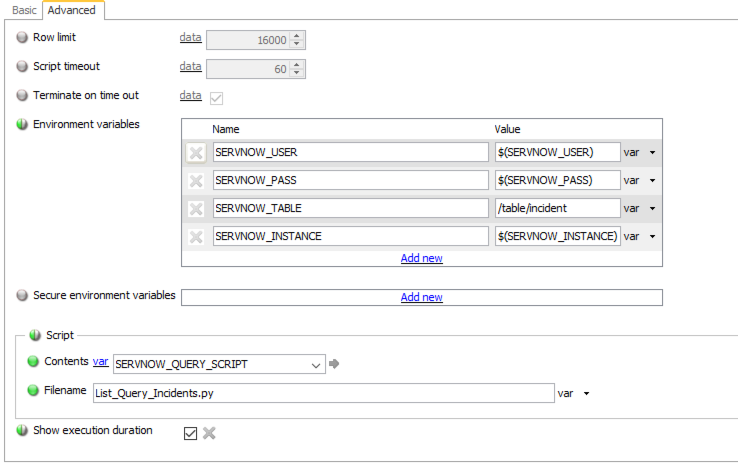
Variable values are configured in the ServiceNow Environment table.
Introduction
This is a PERL script that outputs the Autosys job report in CSV format to STDOUT for ITRS toolkit. This is done by leveraging the Autosys autorep command. Returns the latest Autosys job report from the previously saved file or just the ITRS header if there is no report available. The script checks whether the report file is stale and if so starts a background process to create a new one. Older files (10x refreseh period) are removed.
MIT License
Copyright (c) 2014 ITRS Group PLC
Permission is hereby granted, free of charge, to any person obtaining a copy of this software and associated documentation files (the "Software"), to deal in the Software without restriction, including without limitation the rights to use, copy, modify, merge, publish, distribute, sublicense, and/or sell copies of the Software, and to permit persons to whom the Software is furnished to do so, subject to the following conditions:
The above copyright notice and this permission notice shall be included in all copies or substantial portions of the Software.
THE SOFTWARE IS PROVIDED "AS IS", WITHOUT WARRANTY OF ANY KIND, EXPRESS OR IMPLIED, INCLUDING BUT NOT LIMITED TO THE WARRANTIES OF MERCHANTABILITY, FITNESS FOR A PARTICULAR PURPOSE AND NONINFRINGEMENT. IN NO EVENT SHALL THE AUTHORS OR COPYRIGHT HOLDERS BE LIABLE FOR ANY CLAIM, DAMAGES OR OTHER LIABILITY, WHETHER IN AN ACTION OF CONTRACT, TORT OR OTHERWISE, ARISING FROM, OUT OF OR IN CONNECTION WITH THE SOFTWARE OR THE USE OR OTHER DEALINGS IN THE SOFTWARE.
Introduction This solution is presented in 2 different ways. The Include is the one stop shop that contains the type, sampler and SQL. The SQL folder contains the raw sql files which can be copied and pasted into an existing deployment.
include XML The include XML contains a single type and sampler. The sampler is an SQL-Toolkit with the 5 basic queries inline. Users will need to add their authentication information or define the named variables.
ORACLE_DB_NAME: Oracle Instance Name
ORACLE_USER: Username with access to the required tables
ORACLE_PASS: Your password for the named user
ORACLE_TRACE_FILES_DIRECTORY: Variable for the Directory Path of the Oracle Trace files to be added to an FKM view
raw sql The sql directory contains 5 sql statements that can be copied and pasted into an existing SQL-Toolkit plugin.
Warning
DEPRECATED
Please use the updated integration in the cordial repo:
Direct link: https://github.com/ITRS-Group/cordial/tree/main/integrations/pagerduty
ITRS © Integration for PagerDuty service. This script allows you to view, create, acknowledge, resolve, and close PagerDuty incidents via the Geneos environment. This script can be configured by a set of environment variables or command line options (possibly both). Below are requirements, installation process, and command examples for particular filtered and non-filtered outputs.
"PagerDuty is a SaaS-based platform used for agile incident management, not a monitoring system. PagerDuty is used as an add-on to trigger the right actions to all the data from your existing monitoring tools. PagerDuty provides sophisticated event management as well as infrastructure health visualizations to identify patterns and trends, but leaves finding problems with your systems to your existing monitoring tools." reference
With that being said, Geneos comes into play as an eloquent monitoring tool with PagerDuty. This include file lets you automate or manually manage your incidents through the Gateway and Active Console.
You must have python 2.7 or higher installed:
$ python -V
This script does depend on the requests module:
$ pip install requests
To get an Integration Key, following
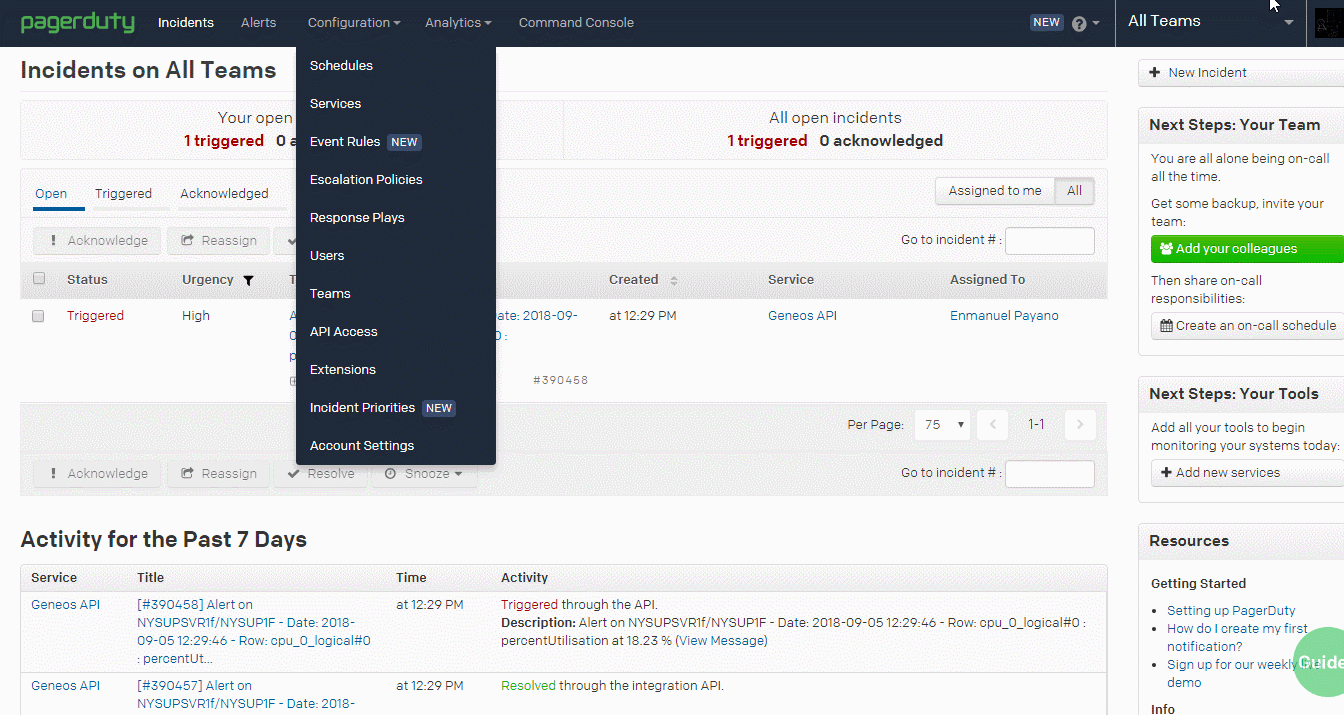
- Step 1 - In your PagerDuty account, go to Configuration > Services:
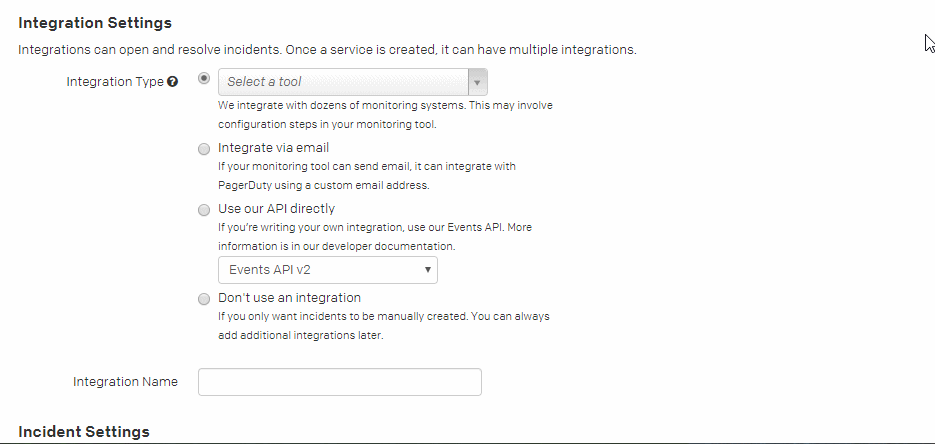
- Step 2 - Click on “New Service”, it should redirect to a configuration page:

-
Step 3 - On this page, you will need to configure the following settings for the Geneos Integration.
- A - Fill out the General Settings to best fit your environment:

- B - Then fill out the necessary information for the Integrations:
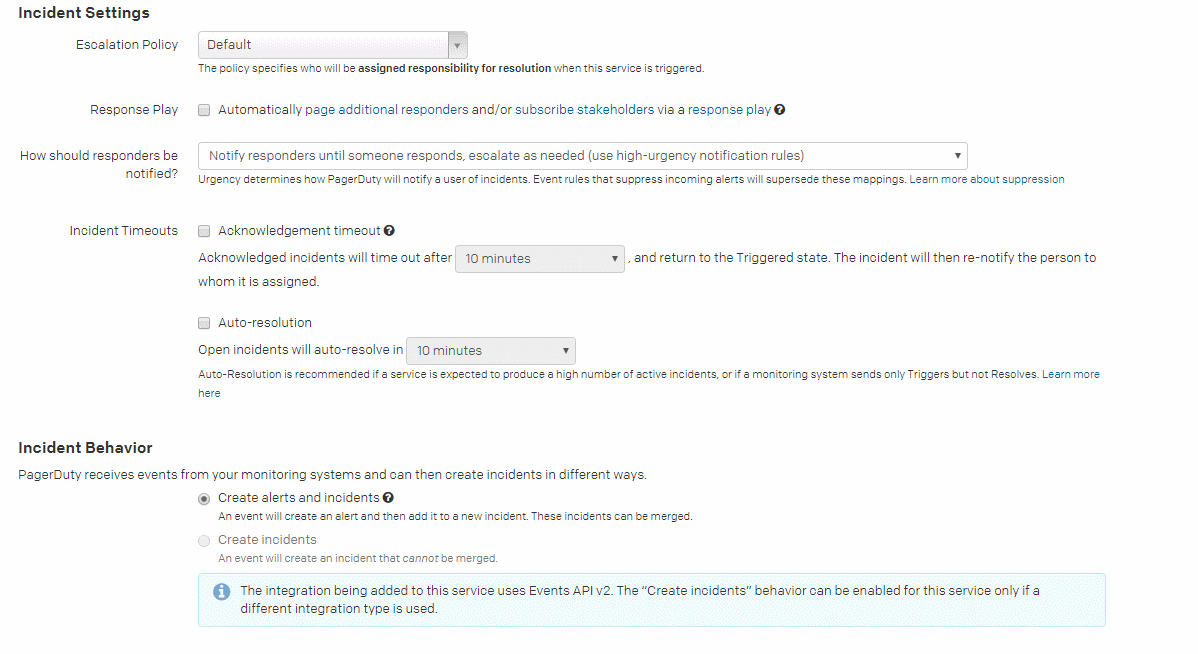
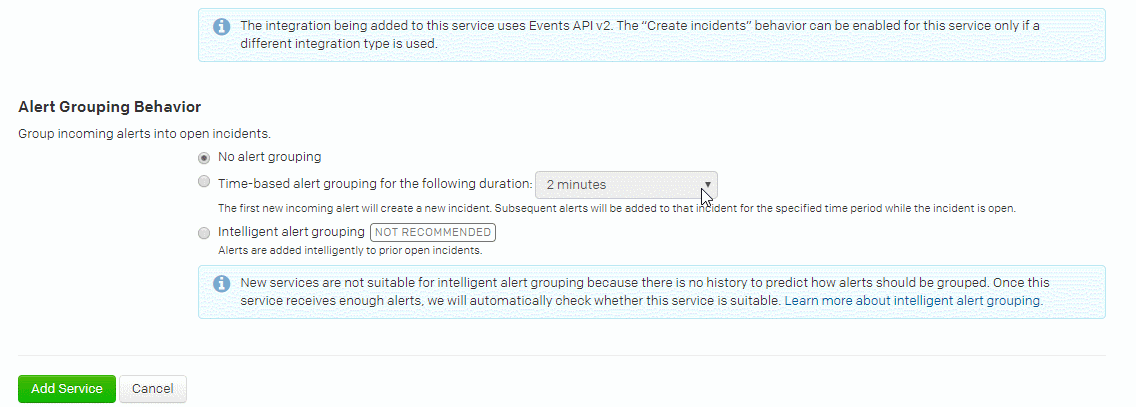
- C - For Incident Settings and Behavior, make sure that “Create alerts and Incidents” is checked off:
- D - For Alert Grouping Behavior, you can configure to your preference. Once done with these settings, please click on “Add Service”:
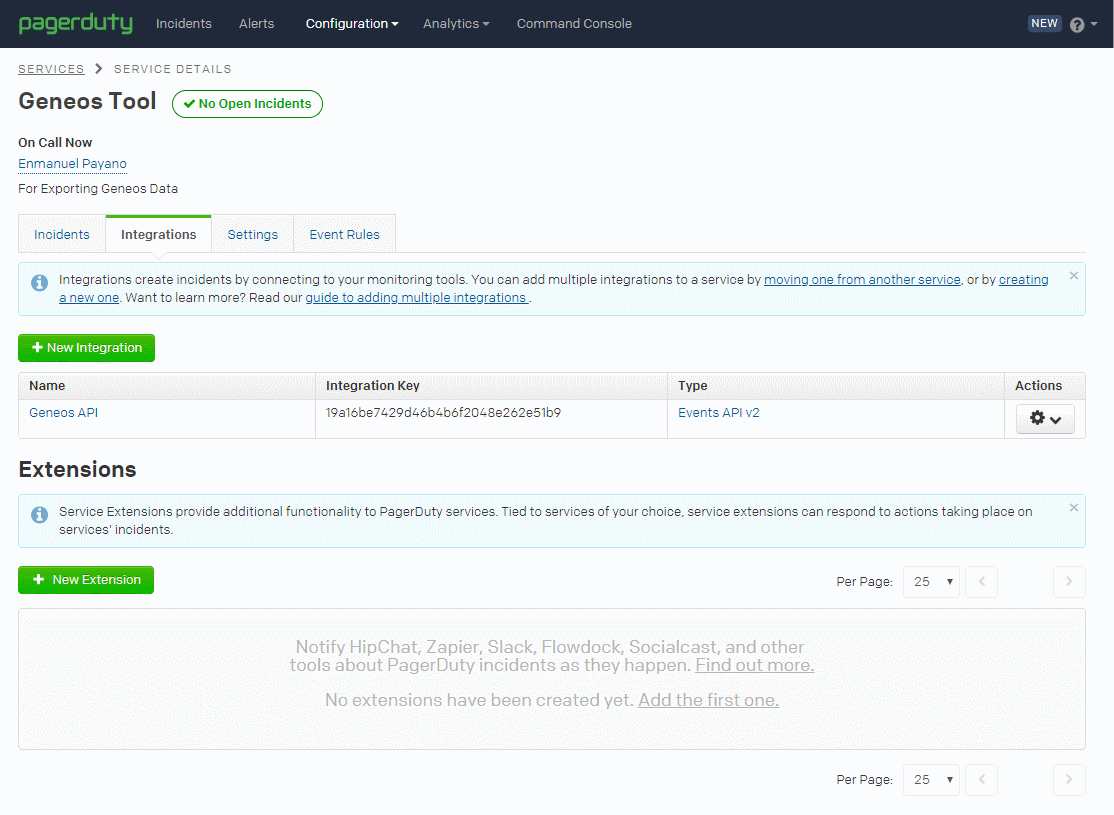
- E - After adding the service, you should be forwarded to a page displaying your Integration Key. Copy this value for later use:
A Geneos For this to properly operate for current build and future:
You may need to FTP the script. Just be sure to have the script somewhere that is accessible on the server for your Gateway to execute.
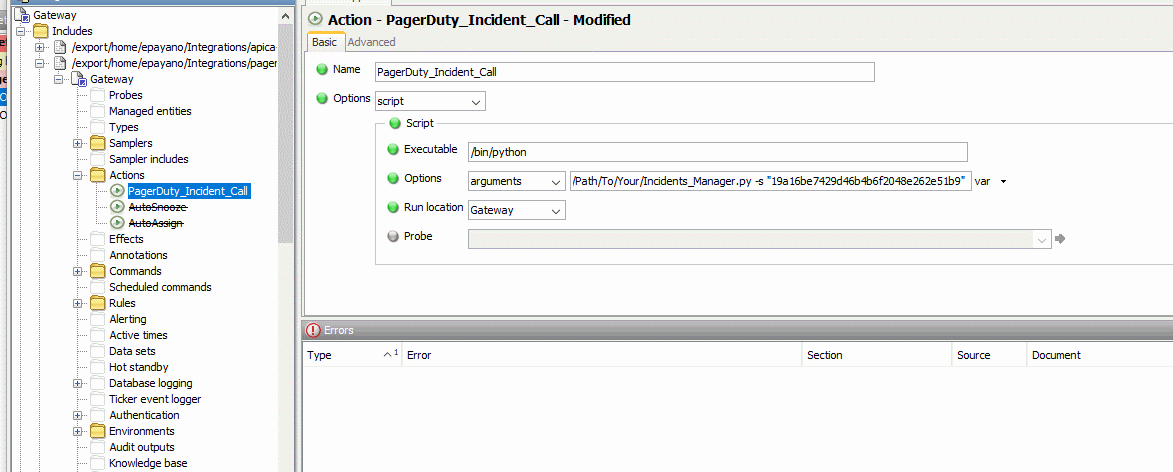
- Step 1 - Right click on the desired gateway for your script, and click on “Configure”:
- Step 2 – Create an action, then configure your path to the script. Here you can supply PagerDuty’s “Integration Key” as a command-line option.
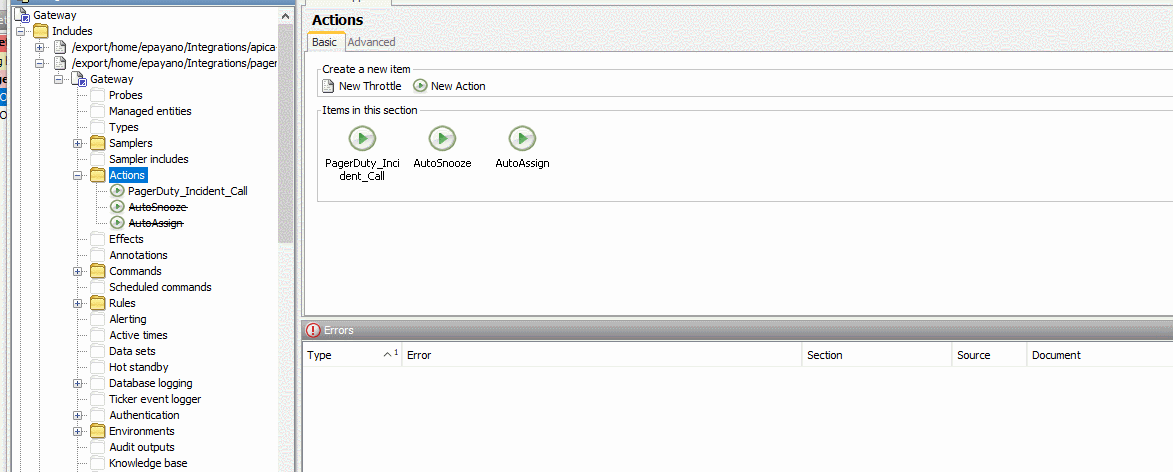
- Step 3 – Finally apply it to a rule where you would like to execute the integration from.
Introduction
This solution is provides several different perl script to for use with gateway2.
scripts
The scripts directory contains the available email scripts. email.pl Attempt at one stop shopping for multiple formats as opposed to having to maintain multiple scripts. Works for gateway user assignment and escalation. Accepts email addreses as either the userdata "eMail" or command line arguments. Makes subject nice and short so suitable for smartphones.
Symlinking this script to the following names helps invoke different functionality:
- email_assign.pl -> email.pl
- email_unassign.pl -> email.pl
- email_escalate.pl -> email.pl
email_ws.pl Modification of email.pl to send dataviews as retrieved from webslinger to be sent as part of the email. Uses wget to access webslinger. As the webslinger URL is built using a static URL path you have to modify two lines at the top of the script.
- webslingerHost = the host: port of the webslinger url
- attributes = .Comma separated list of the attributes used by webslinger. Should match the webslinger.setup VIEW_PATH.
Symlinking this script to the following names helps invoke different functionality:
- email_assign.pl -> email.pl
- email_unassign.pl -> email.pl
- email_escalate.pl -> email.pl
The ability to automate geneos alert messages into your Slack environment.
You must have python 2.7 or higher to install:
$ python -V
This script does depend on the requests module:
$ pip install requests
And finally you need to have the webhook_url, generated from your Slack environment. Which can be found here.
Introduction
This integration is a simple Geneos toolkit that calls the default Apache "server-status" http page that runs on every apache server. The Web Server must have the mod_status Module loaded and enabled. You can read more about this Module by searching for it on Apache's home page. The Scrpit contained in this project require the variable below be set. To set this in an in-line toolkit, use the environment variable section in the Gateway Setup Editor
APACHEWEBSERVERNAME: Environment and Geneos Variable defining the Apache Web Server to query. ex. www.apache.org
toolkit script
The toolkit script is the most stripped down option in this package. To see the outputs it can be run from the commandline as long as the environment variable above is set.
MIT License
Copyright (c) 2014 ITRS Group PLC
Permission is hereby granted, free of charge, to any person obtaining a copy of this software and associated documentation files (the "Software"), to deal in the Software without restriction, including without limitation the rights to use, copy, modify, merge, publish, distribute, sublicense, and/or sell copies of the Software, and to permit persons to whom the Software is furnished to do so, subject to the following conditions:
The above copyright notice and this permission notice shall be included in all copies or substantial portions of the Software.
THE SOFTWARE IS PROVIDED "AS IS", WITHOUT WARRANTY OF ANY KIND, EXPRESS OR IMPLIED, INCLUDING BUT NOT LIMITED TO THE WARRANTIES OF MERCHANTABILITY, FITNESS FOR A PARTICULAR PURPOSE AND NONINFRINGEMENT. IN NO EVENT SHALL THE AUTHORS OR COPYRIGHT HOLDERS BE LIABLE FOR ANY CLAIM, DAMAGES OR OTHER LIABILITY, WHETHER IN AN ACTION OF CONTRACT, TORT OR OTHERWISE, ARISING FROM, OUT OF OR IN CONNECTION WITH THE SOFTWARE OR THE USE OR OTHER DEALINGS IN THE SOFTWARE.
In this tutorial, we will enable CollectL and visualize the results in the Active Console. At this point, you should have installed CollectL software including the documentation and ITRS script provided.
CollectL can be used to generate data in three different ways, either brief, verbose, or detailed. In addition, the user can specify a script with pre-defined configuration and received the desired pre-formatted output.
The ITRS script provided, namely itrs.ph, contains pre-formatted output and configuration parameters. It’s also configured to support CPU, Network, Process, Memory, and Infiniband statistics. For example, simply running the following command will generate the proper output for the statistics specified:
collectl -sCN –export itrs (for CPU and Network Stats)
Now that you have the stats generated into the appropriate files, let’s configure a new IX-MA sampler to display the information.
Configuring the IX-MA sampler is very simple once you determine the format of your data.
In this example, our output will be formatted as a comma-separated file for both CPU and Network.
-
Create a new IX-MA Sampler and click ‘Add New’ under Adapters section.
-
Select Text and click ‘Text Adapter’.
a. Source – leave this blank
-
In Trackers section, select fieldValue under ‘options’ and click ‘Field Value Tracker’.
a. Name – create a specific name (ex. MyCpu ) for reference
b. Filter – set to ‘ALL’ to include all characters
c. Field Name – specify field position (ex. field_1 , for first position in row data)
d. Repeat Step 3 for each significant field in row data
-
Add Column Labels for each field
-
In Options section, select ‘Row Seed Selection’.
a. Row Seed Selection – set to ‘ALL’ to include all rows
b. Row Seed Cells – add each significant field parameter (ex.
$MyCpu) -- must use ‘$ ’ as a prefix to indicate the Name of the field assigned in Step 3. -
Go to Advanced tab of the sampler as shown below
a. Set File Trigger to the SAME filename used in Text Adapter section
Initial NTP-Status integration include file.
This currently supports the standard ntpd package, which must be pre-installed, and as well as the enhanced Linux one (where ntpq has a wide option). Needs more testing across OSes
Requires bash, will not work with default Bourne or Korn shells as it requires bash specific extensions.
How to use:
Download at least the XML file or use the remote "raw" URL direct from github for systems that have external public access and once validated add an NTP-Status sampler to your chosen Managed Entities or into your preferred infrastructure monitoring Type.
Additionally the environment variable NTPHOST can be defined to query a remote host. Default is a localhost connection.
The PATH environment variable is defined in the default sampler as most users do not have ntpq in their default path.
TODO:
- Windows support for Meinberg NTPD
- Chrony support (Different sampler)
Introduction
The netsnmp snmp table function allows
Prerequisites
- This solution uses the
snmptablefunction included with thenetsnmputility package. The function should be avaialble to be run from the commandline by the user running the netprobe. - Geneos toolkit license are required to run this sampler.
- The toolkit script
snmptable.shis by default placed into the$NETPROBEHOME/scriptsdirectory or can be set in the sampler XML. - Visibility to the SNMP service on any remote server being monitored.
.MIB file
The MIB file should be provided by the vendor of the software or hardware.
snmptable.sh
The snmptable.sh script is a Geneos toolkit script that sources the information from the supplied MIB file, runs the snmptable command and formats the output into Geneos tookit form.
snmptable.xml
The snmptable.xml is an example sampler XML that can be copied and pasted into your GSE.
Set the required variables:
VENDOR: The search string for MIB files
TABLE: The table to use inside the vendor MIB file
COMMUNITY: The SNMP community string
HOST: This is the IP Address of the server
MIBDIR: The directory where the MIB files are stored, note that MIB files can IMPORT other MIB files
MIT License
Copyright (c) 2014 ITRS Group PLC
Permission is hereby granted, free of charge, to any person obtaining a copy of this software and associated documentation files (the "Software"), to deal in the Software without restriction, including without limitation the rights to use, copy, modify, merge, publish, distribute, sublicense, and/or sell copies of the Software, and to permit persons to whom the Software is furnished to do so, subject to the following conditions:
The above copyright notice and this permission notice shall be included in all copies or substantial portions of the Software.
THE SOFTWARE IS PROVIDED "AS IS", WITHOUT WARRANTY OF ANY KIND, EXPRESS OR IMPLIED, INCLUDING BUT NOT LIMITED TO THE WARRANTIES OF MERCHANTABILITY, FITNESS FOR A PARTICULAR PURPOSE AND NONINFRINGEMENT. IN NO EVENT SHALL THE AUTHORS OR COPYRIGHT HOLDERS BE LIABLE FOR ANY CLAIM, DAMAGES OR OTHER LIABILITY, WHETHER IN AN ACTION OF CONTRACT, TORT OR OTHERWISE, ARISING FROM, OUT OF OR IN CONNECTION WITH THE SOFTWARE OR THE USE OR OTHER DEALINGS IN THE SOFTWARE.
Introduction
This toolkit script utilizes packaged utilities ps and pgrep to query kernel information on the threads of selected processes. It creates a single dataview that lists the processes as you would see them in the processes view and utilizes the Geneos # syntax to group and indent the threads with their master process. This package currently contains solutions for linux and solaris.
Prerequisites
ps
pgrep: procps v3.0.0 or greater pgrep (http://procps.sourceforge.net/changelog.html )
sed
awk for linux
nawk for solaris
Tested Versions
Linux 2.6.32-504.el6.x86_64 Red Hat Enterprise Linux Server release 6.6 (Santiago)
Linux 3.16.6-203.fc20.x86_64 Fedora release 20 (Heisenbug)
Linux 2.6.32-358.el6.x86_64 CentOS release 6.4 (Final)
Linux 2.6.18-400.1.1.el5.centos.plus x86_64 CentOS release 5.11 (Final)
Generic_127127-11 SunOS 5.10 sun4v
Generic_137111-03 SunOS 5.10 sun4v
Usage
The arguments are a space separated list of strings to match against. If the search string has a space in it you need to double quote it. By default the rownames are the patterns supplied to the argument. If the pattern string is too complex for a rowname you can alias the rownames (e.g. pattern=alias). If there are multiple equals signs the alias is the string after the last equals sign.
threadstat_linux.sh ProcA ProcB "Proc C=C"
ProcA
	ProcA#1
	ProcA#2
ProcB
	ProcB#1
	ProcB#2
C
	C#1
	C#2
Notes
On solaris pgrep will only match against the first 80 characters of the command line.
If multiple PIDs match a single pattern then the oldest PID found is used.
The ability to automated geneos alert messages into your Symphony environment.
You must have python 2.7 or higher to install:
$ python -V
This script does depend on the requests module:
$ pip install requests
And finally you need to have the webhook_url, generated from your Symphony environment for messages to be directed.